
The leaves on your plants start to look dull. Then you notice tiny pale speckles spreading across the surface. Flip a leaf over, and you might see fine webbing and barely visible moving dots.
That’s spider mites—and by the time you see webbing, the infestation is already established.
If you’re not completely sure what pest you’re dealing with, start with the Garden Pest Identification Guide.
For a full system to treat and prevent problems across your garden, see the Garden Pest Control Guide.
For natural treatment options, use the Organic Garden Pest Control guide.
Quick Answer
Spider mites are tiny sap-feeding arachnids that spread rapidly in hot, dry conditions. The most effective control method is repeated disruption—water sprays, removal, and follow-up treatments—rather than a single application.
What Spider Mites Are (and Why They’re Different)
Spider mites are not insects. They are arachnids, related to spiders and ticks.
This matters because:
- they respond differently to treatments
- they reproduce faster than most garden pests
- they thrive in heat and dryness
They live mostly on the underside of leaves, feeding by piercing plant cells and draining fluids.
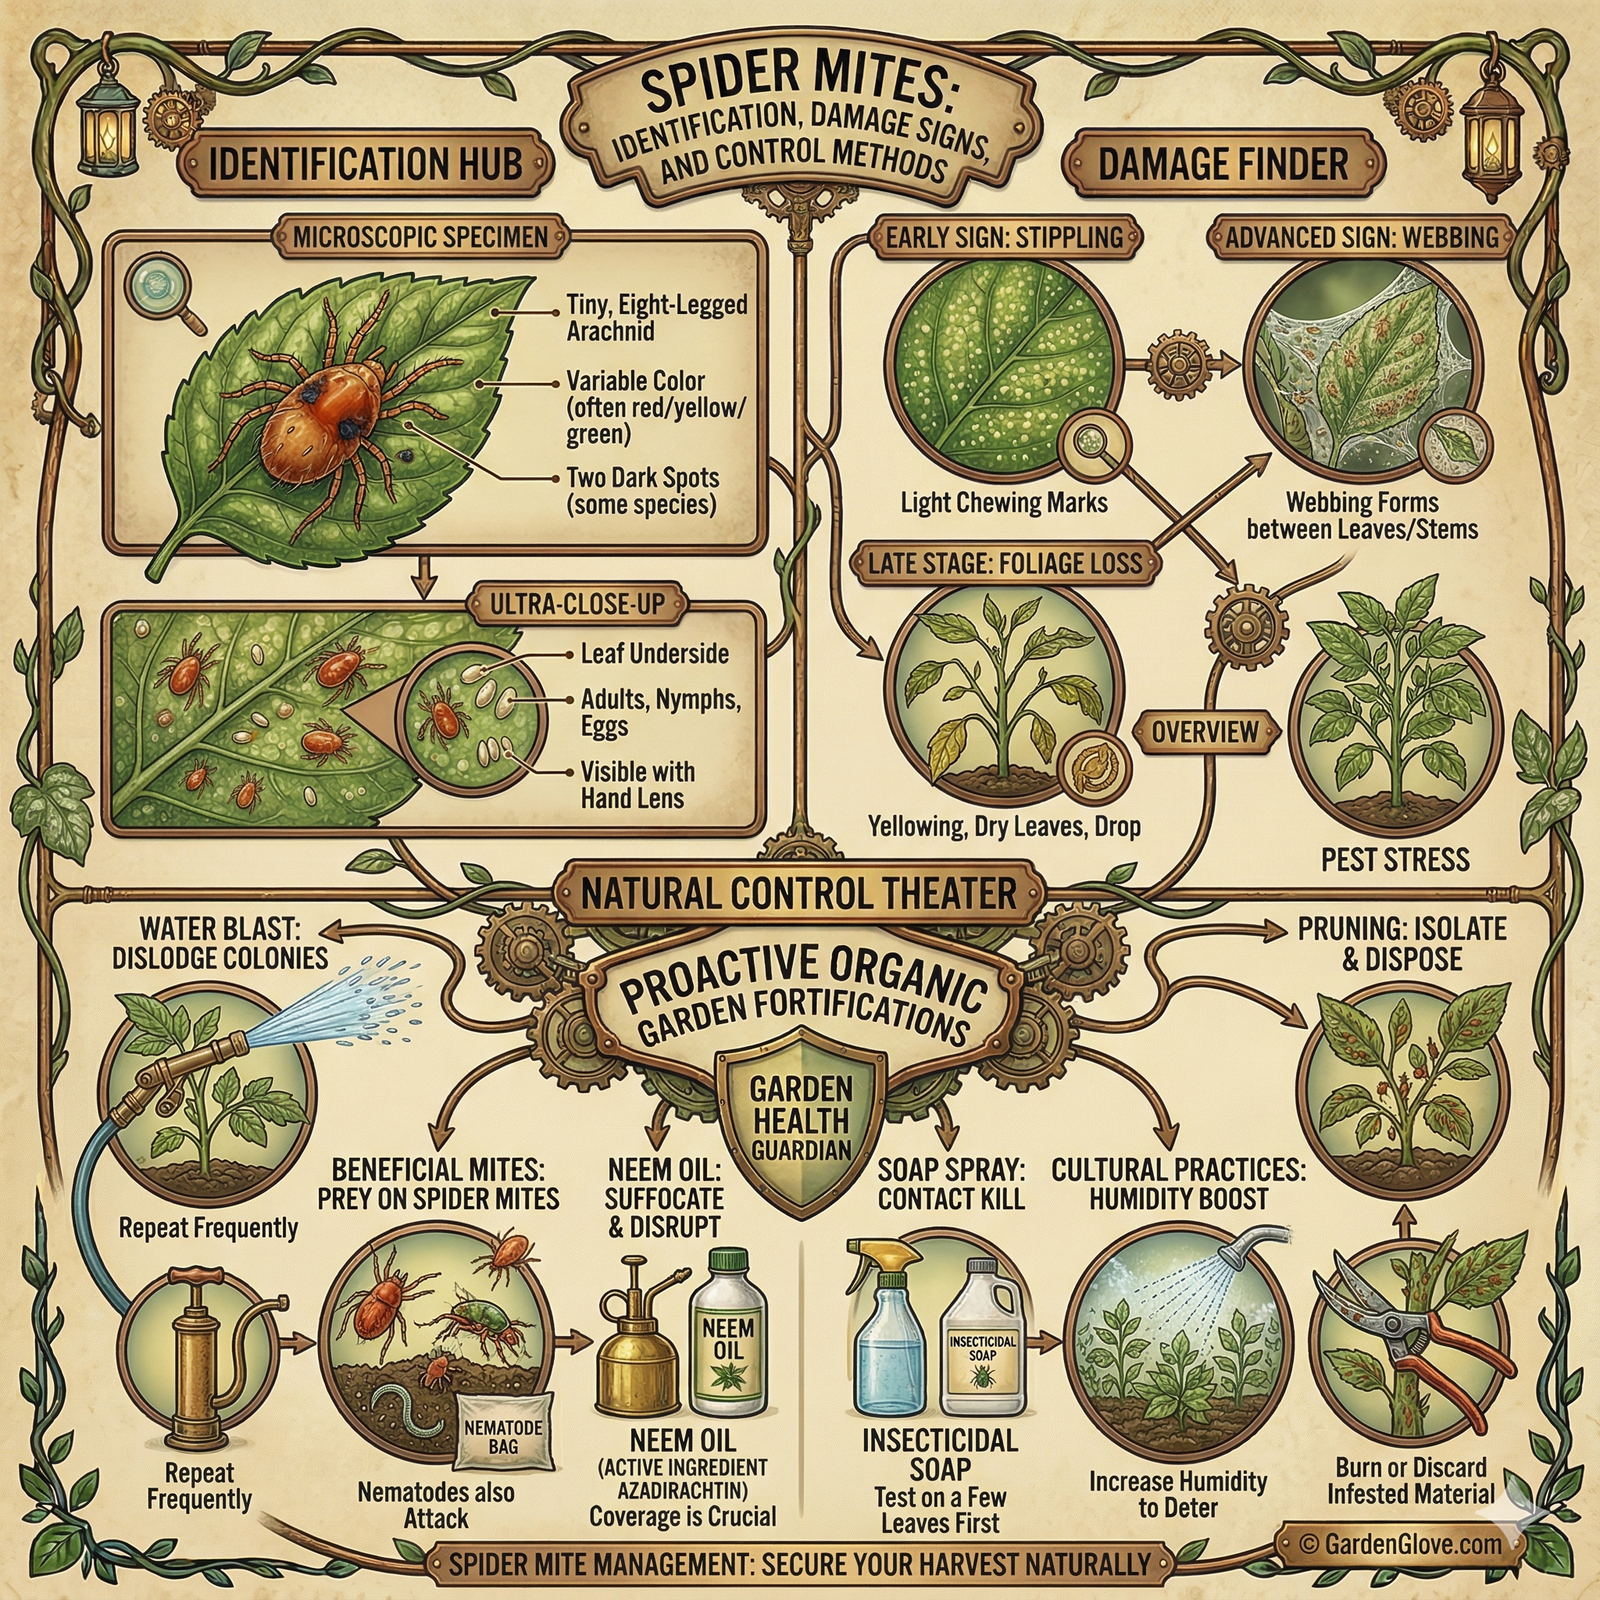
Signs of Spider Mite Damage
Spider mites are usually identified by damage patterns, not by seeing the mites themselves.
- pale stippling (tiny light dots across leaves)
- dull or dusty-looking foliage
- fine webbing under leaves or between stems
- yellowing leaves over time
- eventual leaf drop in severe cases
Simple Test
Tap a leaf over a piece of white paper.
If you see tiny moving specks:
👉 you likely have spider mites
If You’re Not 100% Sure
Spider mite damage can be confused with other pests.
Compare with:
Why Spider Mites Spread So Fast
Spider mites reproduce extremely quickly.
- a generation can complete in under a week in hot weather
- populations overlap (eggs + juveniles + adults at once)
This means:
- small infestations become severe very quickly
- inconsistent treatment leads to immediate rebound
How to Get Rid of Spider Mites (Step-by-Step)
This is where most people either solve the problem—or make it worse.
1. Start with Water
A strong spray of water is one of the most effective first steps.
- removes mites physically
- disrupts colonies
- targets undersides of leaves
Repeat every few days.
2. Remove Heavily Infested Leaves
If sections are badly damaged, remove them.
This:
- reduces population immediately
- prevents spread
3. Apply Insecticidal Soap
Insecticidal soap works well on spider mites when applied correctly.
Key point:
👉 you must coat the underside of leaves
4. Use Neem Oil (Follow-Up Control)
Neem oil helps interrupt feeding and reproduction.
It works best when:
- used consistently
- combined with other methods
5. Repeat (This Is Critical)
Spider mites are not solved in one treatment.
You need:
- repeated applications
- consistent monitoring
This is what actually breaks the life cycle.
What Actually Works (and What Doesn’t)
What works:
- repeated water + treatment cycles
- targeting leaf undersides
- acting early
What doesn’t:
- one-time spraying
- ignoring early stippling
- letting conditions stay hot and dry
How to Prevent Spider Mites
Spider mites thrive under stress conditions.
To prevent them:
- water consistently
- reduce dust around plants
- avoid overcrowding
- monitor plants regularly
Healthy plants are less vulnerable. Improve overall structure with the Vegetable Gardening Guide.
Common Mistakes
- waiting until webbing appears
- spraying only visible areas
- stopping treatment too early
- treating symptoms instead of conditions
Where to Go Next
For related issues, see:
For broader disease issues, review Fungal Diseases in the Garden.
For hands-on work, use durable protection from Best Garden Gloves.
Conclusion
Spider mites are one of the fastest-moving problems in a garden, but they’re also one of the most manageable when caught early.
The key is not intensity—it’s consistency. Once you interrupt their cycle long enough, the infestation collapses.