A 2–3 inch layer of the right material, applied correctly, reduces watering by up to 70%, keeps weeds from gaining a foothold, and builds healthier soil every season. It’s the single highest-return habit in a raised bed garden.
Why Raised Beds Need Mulch More Than In-Ground Gardens
Raised beds drain faster than in-ground soil. That’s one of their main advantages — but it also means they dry out quickly, especially in July heat. Without mulch, a raised bed in summer may need daily watering. With it, you’re watering two or three times a week at most. If you’re still dialing in frequency by crop and season, this vegetable garden watering guide helps.
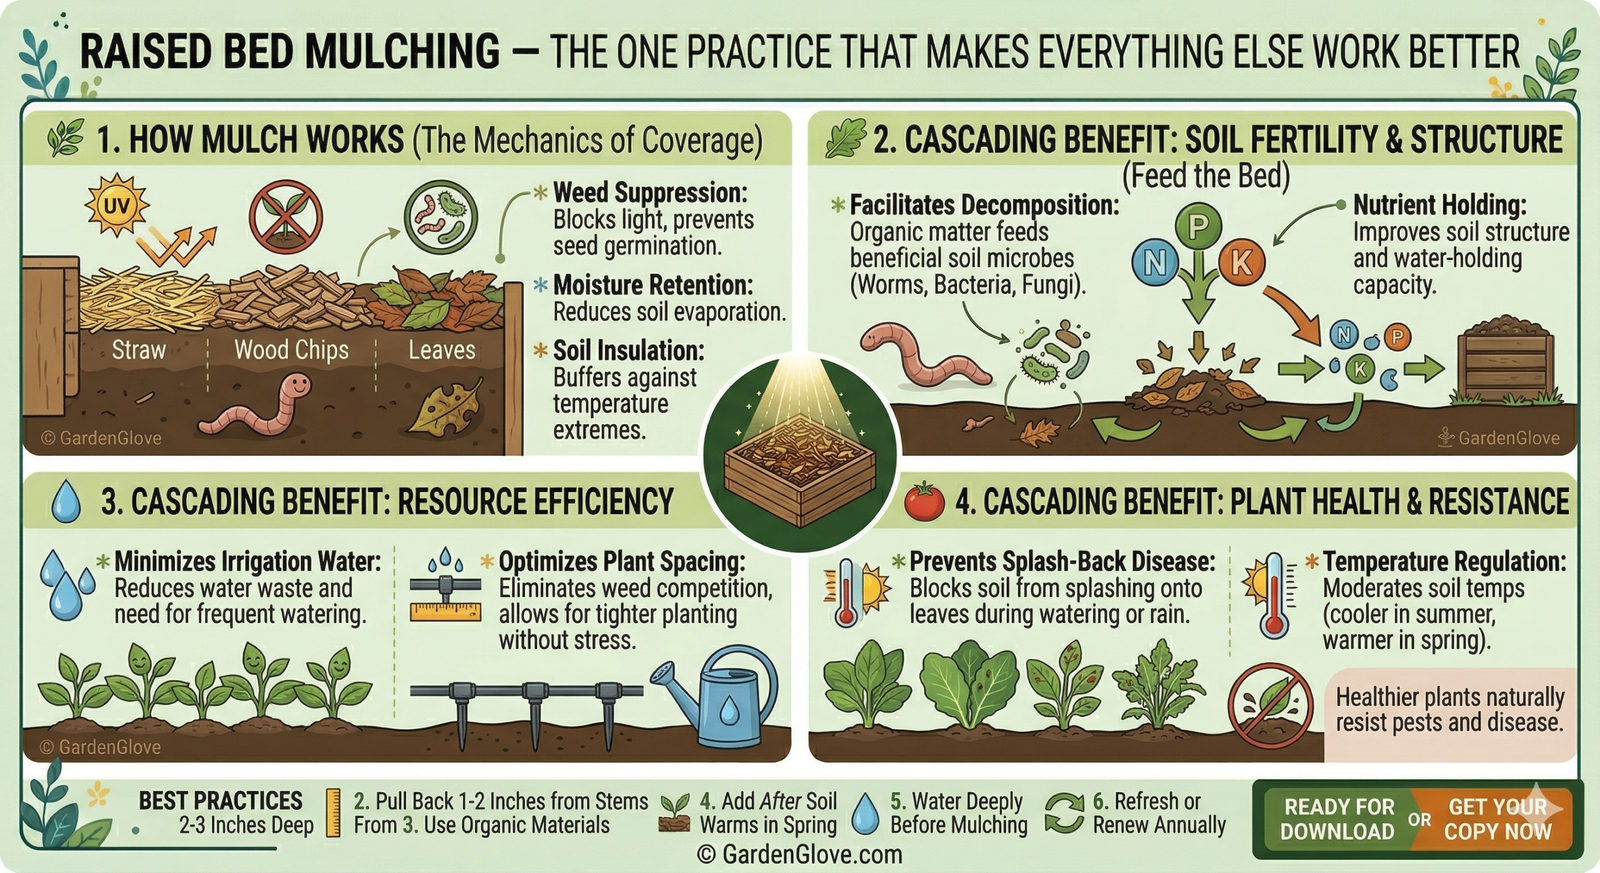
That’s the headline benefit. But mulch is doing several other things at the same time:
Weed suppression. A solid 2–3 inch layer blocks sunlight from reaching the soil surface. Most weed seeds never germinate. The few that do push through are easy to pull from loose mulch rather than compacted soil.
Temperature regulation. Bare raised bed soil can run 10–20°F hotter at the surface on a summer afternoon than mulched soil. That heat stresses roots and accelerates moisture loss. Mulch buffers both.
Disease reduction. Fungal diseases like early blight and Botrytis spread largely through soil splash — raindrops hitting bare soil kick up spores onto lower leaves. A mulch layer absorbs that impact and breaks the cycle. It’s one of the simplest cultural controls in a broader raised bed pest control system.
Soil health. Organic mulches feed the soil as they break down, encouraging earthworms and the microbial activity that makes nutrients available to plants. A consistently mulched bed has measurably higher biological activity than bare soil. Over time, that contributes directly to better soil in raised beds.
Which Mulch Material Should You Use?
For food-producing raised beds, stick with organic materials. Inorganic options like rubber mulch or landscape fabric don’t decompose — they break down into particles that persist in your soil for decades. Not worth it.
Here’s how the main organic options compare:
Material
Best For
Depth
Notes
Straw
Most vegetables, transplants
2–3 in
Use straw, not hay — hay contains weed seeds
Shredded leaves
Any crop, fall beds
2–3 in
Must be shredded — whole leaves mat and repel water
Aged wood chips
Perennials, pathways
2–3 in
Fresh chips cause nitrogen drawdown in veg beds
Finished compost
Heavy feeders, new plantings
1–2 in
Breaks down fast; pair with straw for season-long cover
Grass clippings
Leafy crops, herbs
1 in max
Pesticide-free only; too thick = slimy mat
Cardboard
Base layer under mulch
Single layer
Wets down, then cover with straw or chips
© GardenGlove.com
Straw is the default choice for most vegetable beds — lightweight, water-permeable, slow to break down, inexpensive. Just confirm it’s straw (not hay) and ideally untreated, since some straw is sprayed with persistent herbicides that can damage vegetable plants even after composting.
Shredded leaves are free and excellent. Whole leaves are not — they mat into a water-repellent layer. Run a lawn mower over them first. Shredded, they break down within a season and contribute meaningful organic matter.
Wood chips work well in pathways and around perennials but require caution inside vegetable beds. Fresh chips tie up nitrogen as they decompose, which can stunt vegetable growth noticeably. If you want wood chips in beds, use aged chips — at least a year old, ideally two.
Compost as mulch sounds redundant but isn’t. Finished compost applied as a 1–2 inch surface dressing delivers mulch benefits while feeding the soil every time it rains. The limitation is volume — it breaks down quickly and requires replenishment. Practical approach: apply compost first, then top with straw for season-long surface protection.
Grass clippings are useful in thin layers only. More than an inch and they mat into an anaerobic layer that blocks water and creates a fungal environment. Also critical: never use clippings from a lawn treated with herbicides. Let clippings dry before applying around tomatoes and other fruiting crops — fresh green clippings push nitrogen hard, which promotes foliage at the expense of fruit.
What to Skip
A few materials that come up often but don’t belong in a vegetable garden:
Rubber mulch — contains toxic compounds, off-gasses in heat, and has no place around food crops
Hay — almost always contains weed seeds that will germinate enthusiastically in your well-prepared bed
Peat moss as surface mulch — dries out, crusts over, and repels water rather than retaining it
Pine needles — acidify soil as they decompose; most vegetables target a pH of 6.0–7.0 and don’t benefit
Dyed or treated bark — chemical treatments don’t belong near food
How to Apply Mulch Without Making Common Mistakes
Getting the application right matters as much as choosing the right material.
Apply to moist soil. Mulch seals in whatever moisture is present underneath. If you mulch dry soil, you lock out rain and irrigation. Water the bed first, let it absorb, then mulch.
Keep mulch away from stems. Leave a 2-inch gap around every plant stem. Mulch piled against stems stays consistently moist — which is exactly the environment crown rot, fungal collar disease, and pests prefer. This matters most with transplants, which are vulnerable early in establishment.
Aim for 2–3 inches. Thinner than 2 inches and you lose most of the weed suppression and moisture retention benefits. Thicker than 4 inches and you risk poor airflow, waterlogging, and slug habitat. The 2–3 inch range is the target for most materials.
Pull mulch back for direct sowing. Seeds need soil contact to germinate. Pull the mulch aside, sow, and push it back once seedlings reach 2–3 inches tall.
Replenish regularly. Organic mulches settle and decompose. Straw usually lasts most of a growing season before needing a top-up. Grass clippings may need replenishing every few weeks. Check depth monthly and add material when it drops below 2 inches.
Timing: When to Mulch Through the Season
Spring — wait for the soil to warm. Mulch insulates whatever temperature is underneath. Applied over cold spring soil, it slows the warming that seeds and transplants need. Wait until soil reaches roughly 60°F for warm-season crops before mulching for the season. If you’re matching mulching to planting windows, this when to plant vegetables guide is the right reference point.
After transplanting. The best moment to mulch is immediately after putting transplants in the ground. Apply the same day — plants benefit immediately from moisture stabilization and temperature buffering during root establishment.
Mid-summer. Top up any mulch that has decomposed or shifted. This is when the moisture-retention benefit pays off most. A bed with a full 3-inch layer in July needs significantly less irrigation than a bare one.
After first hard frost in fall. Apply 3–4 inches once the season’s crops are done. Winter mulch protects soil structure, prevents erosion, and suppresses early weed germination the following spring. Essential for beds with overwintering garlic or perennial crops.
Spring removal. Remove winter mulch once the hard frost risk is past. Leaving thick mulch on into late spring keeps soil cold and delays germination significantly.
The Mistake That Quietly Kills Otherwise Healthy Plants
The most damaging mulching error isn’t using the wrong material or applying too little — it’s letting mulch build up against plant stems over time.
It happens gradually: you apply mulch, it settles, you top it up without pulling it back first, and by midsummer you’ve built a dense, moist collar around every stem. Crown rot and fungal disease move in.
The fix takes ten seconds per plant: before every top-up, pull existing mulch away from stems to re-establish the 2-inch gap, then add fresh material to the surrounding area. Done monthly, it keeps the whole system working the way it should.
Mulch + Drip Irrigation: The Combination Worth Investing In
If you’re using drip lines or soaker hoses, run them at soil level and cover with 2–3 inches of mulch. The mulch protects lines from UV degradation, prevents surface crusting that slows water infiltration, and keeps soil temperature steady around the root zone.
The combined effect is significant — far less water used, far more consistent soil moisture, and measurably better yields over the course of a season. If you haven’t set up drip irrigation yet, our raised bed irrigation guide covers what you need to know.
Quick Recap
Raised bed mulching isn’t complicated, but doing it right requires a few deliberate choices:
- Use organic materials — straw is the easiest default
- Apply 2–3 inches to moist soil
- Keep a 2-inch gap around every stem
- Time it to soil temperature in spring, after planting in summer, after frost in fall
- Replenish when depth drops below 2 inches
- Never let mulch build up against stems
Get those basics right and the returns compound quietly all season: less watering, fewer weeds, healthier plants, better soil every year.
For more on building productive raised beds, see our guides on best soil for raised beds, raised bed pest control, and raised bed irrigation.